Perl-CGIを使用する
目次
Perl-CGIを使用するApacheの設定
CGIは、WEBページを見たユーザーの入力を受け付けたり、その結果で変わるコンテンツを表示したりするなど、いわば「動くページ」を作る技術です。
このWordPressなども「動くコンテンツ」になりますが、最近の動くコンテンツはJavaScriptや、PHPで実装するのが主流で、CGIはあまり見かけなくなりました。
まずはperlの存在を確認する。
CGIを動作させるにはPerlというプログラム言語が必要です。
もし、こうしてVPSで構築したWEBサイト上で、CGIも動かす必要があるなら、まずはPerlがインストールされているかどうかの確認が必要です。
これもVPS提供会社により、若干の違いはありますが、さくらVPSでは、インストール段階でCGIを動かすためのperlというプログラムが標準でインストールされています。
そのperlの実行ファイルは、/usr/bin/perl にあります。
# /usr/bin/perl -v

This is perl 5, version 16, subversion 3 (v5.16.3) built for x86_64-linux-thread-multi
(with 40 registered patches, see perl -V for more detail)

Copyright 1987-2012, Larry Wall

Perl may be copied only under the terms of either the Artistic License or the
GNU General Public License, which may be found in the Perl 5 source kit.

Complete documentation for Perl, including FAQ lists, should be found on
this system using "man perl" or "perldoc perl".  If you have access to the
Internet, point your browser at http://www.perl.org/, the Perl Home Page.
もし、Perlがインストールされていないサーバーをレンタルされた場合は、Perlが入れられるか確認しましょう。
テスト用CGIを配置する
テスト用CGIとして、簡単なものを配置します。
Apacheをインストールしたとき、
# ls
bin    cgi-bin  error   icons    logs  manual
build  conf     htdocs  include  man   modules
のようなディレクトリ構成になっているはずです。
このうち、cgi-binにテスト用CGIを配置します。
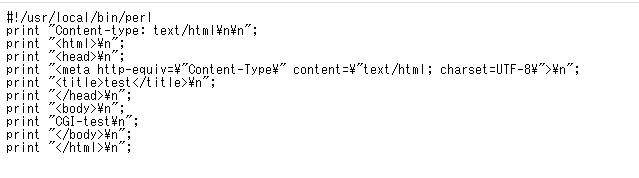
コードはこんな感じにしましょう。
# vi test.cgi

#!/usr/local/bin/perl
print "Content-type: text/html\n\n";
print "<html>\n";
print "<head>\n";
print "<meta http-equiv=\"Content-Type\" content=\"text/html; charset=UTF-8\">\n";
print "<title>test</title>\n";
print "</head>\n";
print "<body>\n";
print "CGI-test\n";
print "</body>\n";
print "</html>\n";
これで、サーバーのURLに、/cgi-bin/test.cgi と付加すれば、CGIが呼び出されます。
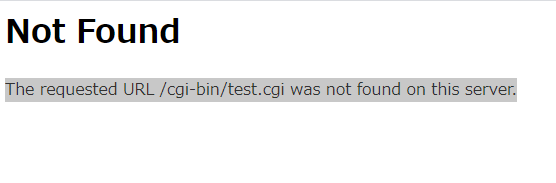
はい。エラーが出ました。
この原因ですが、cgi-bin/test.cgi が見つからないと言ってきています。
配置したのに見つからないのは、Apacheの標準ではCGIがオミットされているからです。
# vi httpd.confで設定ファイルを開くと
    # access content that does not live under the DocumentRoot.
    # Example:
    # Alias /webpath /full/filesystem/path
    #
    # If you include a trailing / on /webpath then the server will
    # require it to be present in the URL.  You will also likely
    # need to provide a <Directory> section to allow access to
    # the filesystem path.

    #
    # ScriptAlias: This controls which directories contain server scripts.
    # ScriptAliases are essentially the same as Aliases, except that
    # documents in the target directory are treated as applications and
    # run by the server when requested rather than as documents sent to the
    # client.  The same rules about trailing "/" apply to ScriptAlias
    # directives as to Alias.
    #
    #ScriptAlias /cgi-bin/ "/usr/local/apache2/cgi-bin/"
一番下の、ScriptAlias /cgi-bin/ “/usr/local/apache2/cgi-bin/” の前に#がついて機能がオミットされているのがわかります。
この#を除去して、httpd.confを保存した後、
# /usr/local/apache2/bin/apachectl restartでApacheを再起動します。
その後、再度、サーバー+/cgi-bin/test.cgi を呼び出してみると
ファイルが見つからないというエラーは無くなりましたが、入力したCGIファイルがそのまま表示されてしまっています。
この場合は、CGIを実行するためのモジュールが読み込まれているか、それと、ディレクトリで実行が許可されているかを確認します。
httpd.conf

#LoadModule cgid_module modules/mod_cgid.so
↓
LoadModule cgid_module modules/mod_cgid.so


<Directory "/usr/local/apache2/cgi-bin">
    AllowOverride None
    Options None
    Require all denied
</Directory>
↓
<Directory "/usr/local/apache2/cgi-bin">
    AllowOverride None
    Options None
    Require all granted
</Directory>

-rw-r--r--  1 apache apache  304 10月 10 15:57 2020 test.cgi
#chmod 755 test.cgi
↓
-rwxr-xr-x  1 apache apache  304 10月 10 15:57 2020 test.cgi
デフォルト設定では、CGIを使わない設定なので、上の設定の一番上で、CGIを実行するモジュールを読み込みます。
また、CGIを実行するディレクトリで、Require all denied により、全てのアクセスを拒否しています。
このため、Require all grantedに切り換えて、アクセスを許可します。
最後に、CGIファイルが実行可能になっている必要があるので、実行権限を変更し、実行を可能にします。
上では、最初xがありません。xが実行可能を意味するので、chmodコマンドで変更しています。
これで実行すると

エラーがでましたが、画面内容がかなりかわりました。
これは、実際にCGIにアクセスし、実行しようとしたのだけれど、実行でエラーになってしまった表示です。
理由ですが、テストプログラムのⅠ行目には
#!/usr/local/bin/perlと、記載しました。
この場合、/usr/local/bin/perl でプログラムを実行してね という意味なのですが、先ほどのように、perlは /usr/bin/perl にあり、このままでは、
# /usr/local/bin/perl -v
bash: /usr/local/bin/perl: No such file or directory
実行しようとすると、「そんなファイルもディレクトリもないよ」と叱られてしまいます。
そこで
# ln /usr/bin/perl /usr/local/bin/perl /usr/bin/perl へのリンクを、/usr/local/bin/perl に作成するという、シンボリックリンクの作成コマンドを与えます。
すると、
# /usr/local/bin/perl -v

This is perl 5, version 16, subversion 3 (v5.16.3) built for x86_64-linux-thread-multi
(with 40 registered patches, see perl -V for more detail)

Copyright 1987-2012, Larry Wall

Perl may be copied only under the terms of either the Artistic License or the
GNU General Public License, which may be found in the Perl 5 source kit.

Complete documentation for Perl, including FAQ lists, should be found on
this system using "man perl" or "perldoc perl".  If you have access to the
Internet, point your browser at http://www.perl.org/, the Perl Home Page.
と、/usr/local/bin/perl でも perlが実行できるようになりました。
これを実行すると、
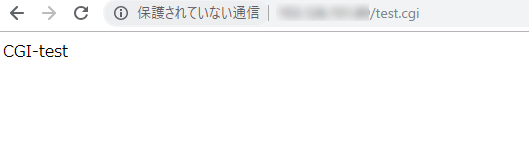
と、テストプログラムが表示されました。
CGIプログラムで配布されているものは、perlのデフォルト設定の場所が/usr/local/bin/perl の事が多いので、この設定はしておいた方が良いでしょう。
CGIファイルの配置場所
それでは、上記の test.cgi を、cgi-binから、htdocsに移動し、パーミッションを変更して、サーバー/test.cgi として実行してみましょう。

エラーになりました。
このエラーは、実行権限を設定していないcgiファイルを実行したときも出現しますが、先ほどの通り、パーミッションは変更しています。
これは、Apacheの標準設定では、CGI機能をオミットしているのと関連しています。
CGIは「プログラム」ですから、可能な限り実行できる場所やユーザーを絞り込んだ方が安全です。
このため、標準の設定では、先ほどのcgi-binのディレクトリ内でしか実行されないようになっています。
公開サーバーの安全性を考えると、CGIを実行しなければならない以上は、可能な限りcgi-binに配置して、実行するようにした方が良いです。
ただ、どうしても他の場所で実行しなければならない事情がある場合は、実行を許可する事ができます。
<Directory "/usr/local/apache2/htdocs">
    #
    # Possible values for the Options directive are "None", "All",
    # or any combination of:
    #   Indexes Includes FollowSymLinks SymLinksifOwnerMatch ExecCGI MultiViews
    #
    # Note that "MultiViews" must be named *explicitly* --- "Options All"
    # doesn't give it to you.
    #
    # The Options directive is both complicated and important.  Please see
    # http://httpd.apache.org/docs/2.4/mod/core.html#options
    # for more information.
    #
    Options Indexes FollowSymLinks

    #
    # AllowOverride controls what directives may be placed in .htaccess files.
    # It can be "All", "None", or any combination of the keywords:
    #   AllowOverride FileInfo AuthConfig Limit
    #
    AllowOverride None

    #
    # Controls who can get stuff from this server.
    #
    Require all granted
</Directory>

↓

<Directory "/usr/local/apache2/htdocs">
    #
    # Possible values for the Options directive are "None", "All",
    # or any combination of:
    #   Indexes Includes FollowSymLinks SymLinksifOwnerMatch ExecCGI MultiViews
    #
    # Note that "MultiViews" must be named *explicitly* --- "Options All"
    # doesn't give it to you.
    #
    # The Options directive is both complicated and important.  Please see
    # http://httpd.apache.org/docs/2.4/mod/core.html#options
    # for more information.
    #
    Options Indexes FollowSymLinks

    #
    # AllowOverride controls what directives may be placed in .htaccess files.
    # It can be "All", "None", or any combination of the keywords:
    #   AllowOverride FileInfo AuthConfig Limit
    #
    AllowOverride None

    #
    # Controls who can get stuff from this server.
    #
    Require all granted
</Directory>
すると、htdocs内、つまりルート以下何処でもCGIの実行が許可されますので、
と、htdocs内に配置したファイルでもCGIが実行できるようになります。
当然ですが、同一サーバー内なら、WordPressからCGIのページを呼び出す事も可能になりますので、なにか旧来コンテンツを維持する必要がある場合の参考にしてください。
ただし、何度も繰り返しますが、CGIはプログラムです。
作者さんが更新しなくなって久しいものなどは、どんな脆弱性を含んでいるか判りませんので、慎重に判断しましょう。